


Swagger, now known as the OpenAPI Specification, is a powerful framework for API design, documentation, and consumption. It provides a standardized way to describe RESTful APIs, enabling developers and consumers to understand the functionalities of a service without accessing its source code. This article guides you through integrating Swagger into a Spring Boot application for effective API documentation, complete with code snippets and explanations.
Adding Swagger Dependencies
First, incorporate Swagger into your Spring Boot project by adding its dependencies. For Maven users, insert the following into your pom.xml file:
<dependency>
    <groupId>io.springfox</groupId>
    <artifactId>springfox-swagger2</artifactId>
    <version>2.9.2</version>
</dependency>
<dependency>
    <groupId>io.springfox</groupId>
    <artifactId>springfox-swagger-ui</artifactId>
    <version>2.9.2</version>
</dependency>
These dependencies include the core Swagger 2 functionality along with Swagger UI for rendering the API documentation in a web browser.
Configuring Swagger in Spring Boot
Next, create a configuration class to enable and configure Swagger within your application:
import org.springframework.context.annotation.Bean;
import org.springframework.context.annotation.Configuration;
import springfox.documentation.builders.RequestHandlerSelectors;
import springfox.documentation.spi.DocumentationType;
import springfox.documentation.spring.web.plugins.Docket;
import springfox.documentation.swagger2.annotations.EnableSwagger2;

@Configuration
@EnableSwagger2
public class SwaggerConfig {
    @Bean
    public Docket api() {
        return new Docket(DocumentationType.SWAGGER_2)
          .select()
          .apis(RequestHandlerSelectors.any())
          .paths(PathSelectors.any())
          .build();
    }
}
This configuration class annotates with @EnableSwagger2 to activate Swagger 2. The Docket bean defines a selection of APIs to be documented using Swagger’s selectors.
Accessing Swagger UI
With your application running, Swagger UI is accessible at http://localhost:8080/swagger-ui.html. This URL presents an interactive documentation interface where you can explore your API’s endpoints, models, and even try out requests directly through the browser.
Enhancing API Documentation
Swagger allows for detailed documentation of API endpoints and their parameters using annotations. Below is an example of how to document a simple greeting endpoint:
import io.swagger.annotations.ApiOperation;
import io.swagger.annotations.ApiParam;
import org.springframework.web.bind.annotation.GetMapping;
import org.springframework.web.bind.annotation.RequestParam;
import org.springframework.web.bind.annotation.RestController;

@RestController
public class HelloController {

    @ApiOperation(value = "Greets the user")
    @GetMapping("/greet")
    public String greet(@ApiParam(value = "Name of the user") @RequestParam String name) {
        return "Hello, " + name;
    }
}
In this example, the @ApiOperation and @ApiParam annotations provide descriptions for the greet method and its parameter, enriching the API documentation viewed in Swagger UI.
By following these steps and utilizing Swagger’s annotations, you can create comprehensive, interactive documentation for your Spring Boot application’s API. This not only facilitates better communication between backend and frontend developers but also streamlines the consumption of your API by external clients.
Consider Model class having these attributes:
Store
| id | integer($int64) |
| petId | integer($int64) |
| quantity | integer($int32) |
| shipDate | string($date-time) |
| status | string Order Status Enum: [ placed, approved, delivered ] |
| complete | boolean |
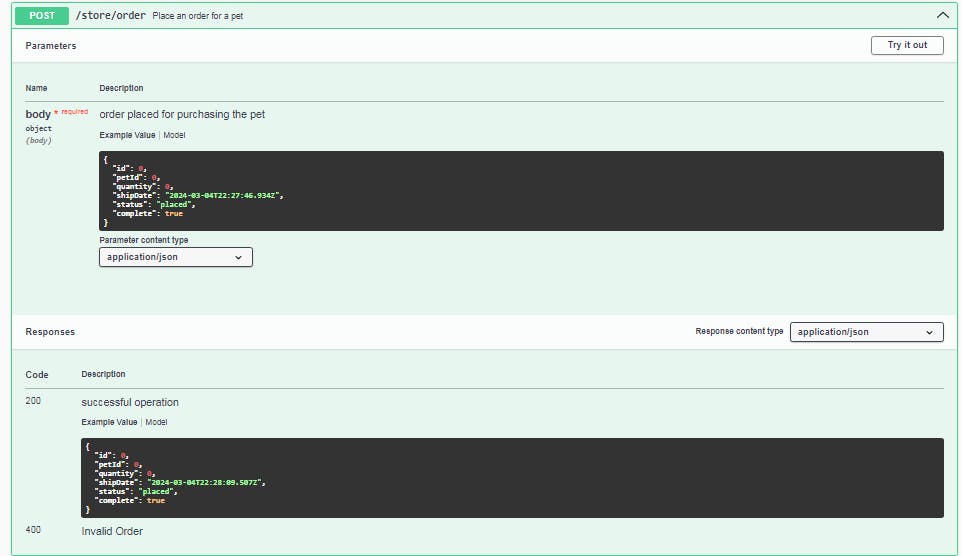
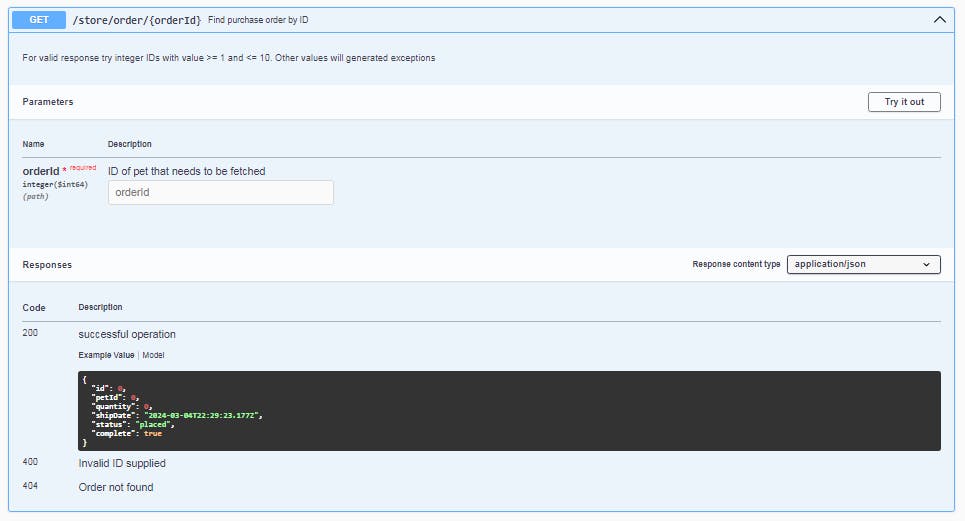
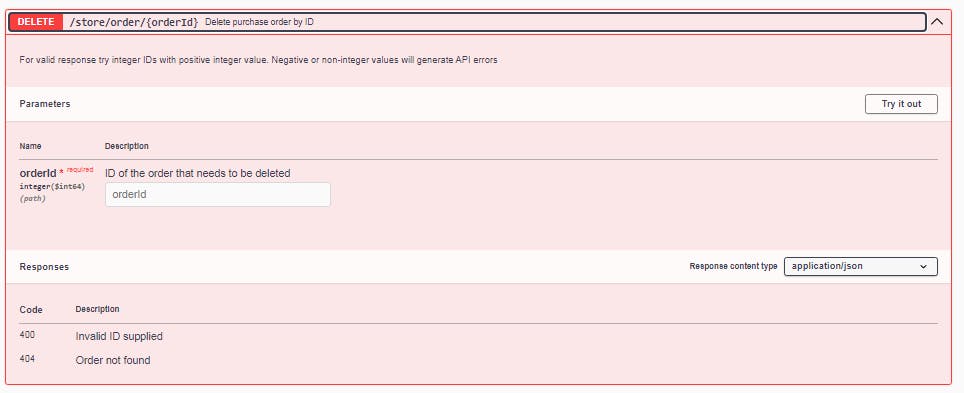
Example screen of swagger for Insert Retrieve and Delete Operations:
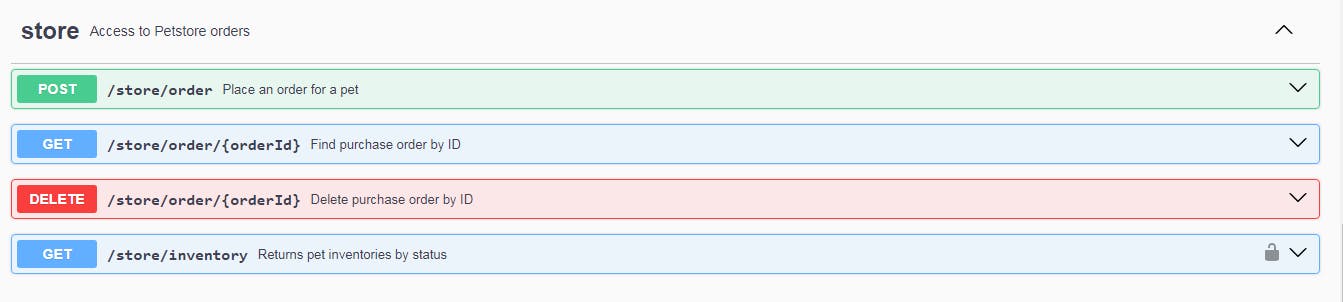
From the picture above, we can easily identify the APIs available in the project and their types, such as POST GET DELETE.
POST
GET
DELETE
Advantages of Swagger :
Simplifies API Development: Swagger tools automate the creation of APIs and documentation, reducing manual coding efforts and minimizing errors.
Interactive Documentation: Swagger UI provides a web-based interface where users can visualize and interact with the API’s resources without implementing any logic.
Client SDK Generation: Swagger Codegen can generate client libraries, API stubs, and server stubs in various programming languages from an OpenAPI Specification.
API Design and Testing: Swagger tools support the design of APIs directly in the browser and testing APIs without writing additional code.
Standardization: Swagger creates a standard, language-agnostic interface to REST APIs, ensuring consistency and understanding across different development teams.
Facilitates API Discoverability and Consumption: By documenting APIs in a common framework, Swagger makes it easier for developers to discover and understand the functionalities of a service.
Supports Secure APIs: Swagger includes annotations to define authentication and authorization schemes for APIs, enhancing security.
Community and Tooling Support: A large community and a wide range of tools and integrations are available, making it easier to adopt and use Swagger across various stages of API development.